I don’t really want “fries” in general. I have a craving for McDonald’s fries, the weird mixture of crispy fried edges, a soft whipped potato consistency, and salt that cling as if a wizard applied it. They’re not steak fries. They’re not boardwalk fries. They are in a category all their own, and once you are in the mood for them, nothing else hits the spot.
Here’s the mildly ridiculous part: you can actually get quite close at home, but only if you stop thinking of fries as a throwaway side and more of an elaborate engineering exercise with tiny potatoes. The method involves a two-step cook (an oil bath at a low temperature and a crisp at a high temperature), and a quick rinse/soak that decreases the amount of surface starch that causes the fries to all stick together into one large, tragic potato raft. I’ve made enough mistakes with these that I have some opinions, and this version is the one that keeps getting requested again and again by anyone who wanders into my kitchen.
Contents
At a Glance
- What you’re making: McDonald’s-style thin fries with a crisp, blistery exterior and a pale-golden finish.
- Why it works: Rinsing removes surface starch; a short low-temp fry sets the structure; a second high-temp fry delivers that signature crunch.
- Timing: 15–20 minutes prep + 30 minutes soak + 15–20 minutes frying (in batches). Optional freezer chill: 30–60 minutes for extra crisp.
- Flavor profile: Clean potato flavor, light oil taste, assertive salt; optionally a whisper of “fast-food nostalgia” from a tiny pinch of sugar and white pepper.
- Key tips: Cut evenly (about 1/4 inch / 6 mm), keep batches small, and salt immediately after the final fry.
Ingredients
There is a myth surrounding McDonald’s French fries the company uses beef flavoring. secret oils! industrial sorcery!). We’re not reconstructing a factory supply chain; we’re reconstructing the eating experience. That means: the right potato, the right cut, the right starch management, and the right two-stage fry.
- Russet potatoes (Idaho-style), 2–3 large: These are high-starch, low-moisture, which gives you that fluffy interior. Waxy potatoes will fight you.
- Cold water, for rinsing/soaking: Clears surface starch so the fries stay separate and crisp.
- White vinegar (optional but helpful), 1 tablespoon: A tiny bit strengthens the surface so fries hold up better through the double fry (no vinegary taste if you keep it modest).
- Neutral frying oil, 6–8 cups: Peanut, canola, vegetable, sunflower, or rice bran. Choose something that doesn’t taste like olives or coconuts.
- Fine salt, to taste: Fine salt clings better than flaky salt here. (Save the flaky stuff for roasted potatoes.)
- Optional “fast-food” seasoning pinch: a tiny pinch of sugar + a pinch of white pepper. Not required, but it nudges the vibe.
Master Ratio (Easy To Scale)
- 1 pound (450 g) russet potatoes (about 2 medium)
- 1 quart (1 liter) cold water for soaking
- 1/2 tablespoon white vinegar (optional)
- Frying oil as needed for 2–3 inches depth in your pot
- 1 to 1 1/2 teaspoons fine salt per pound of potatoes (season right after final fry)
For a small crowd, if you are using 3 pounds of potatoes, soak them in about 3 quarts of cold water (plus 1 1/2 tablespoons of vinegar). When frying, do it in batches: managing crowds is more important than numbering.
Ingredient Choices That Change Flavor
| Choice | Best Option | Swap | What Changes |
|---|---|---|---|
| Potato type | Russet | Yukon Gold | Golds brown nicely but skew creamier and less fluffy; closer to “bistro fries” than McD’s. |
| Oil | Peanut or canola | Vegetable/sunflower | Peanut adds a faint nuttiness; canola is clean and neutral. Avoid strong-flavored oils. |
| Salt | Fine table or fine sea salt | Kosher salt | Fine salt sticks better and tastes “more like fast food.” Kosher is fine, just use a bit more and expect less cling. |
| Soak add-in | Small amount of vinegar | No vinegar | Vinegar helps structure and crispness; without it, still great, just slightly more delicate fries. |
Seasoning (Keep It Classic, Or Nudge It)
I tend to be a purist most of the time: salt and only salt. On rainy nights when I want to experience the full drive-thru illusion, I combine 1 teaspoon fine salt + 1/8 teaspoon sugar + 1/8 teaspoon white pepper and sprinkle it on the fries right after frying. It’s easy to tell if you’ve added too much; if it tastes sweet, you’ve added too much.
Instructions
Equipment note: Having a deep, heavy-bottomed pot or Dutch oven and a thermometer will make things easier. Vous pouvez bien sûr estimer la température de l’huile. I’ve done it. I’ve also served my family pale, limp fries, telling them they’re “supposed to be like that.” A thermometer is cheaper than denial.
1) Slice the potatoes into thin fry shapes.
For a McDonald’s look, peel the russets and then slice them into 1/4 inch (6 mm) sticks. Try to keep them even so they cook at the same rate. I sliced then batonnet cut it, as if I was pretending I went to culinary school.
2) Rinse and soak to remove starch.**
Fill a large bowl with cut fries and rinse cold water over the fries. Agitate with your hand and continue until the water is less cloudy. Then add fresh cold water, and if you’re using it, add the vinegar. Soak 30 minutes or refrigerate for a couple of hours. While this is probably the most annoying step, it is still important since it helps prevent your fries from sticking together.
3) Make sure the fries are completely dried.
After draining, spread the fries on a towel (or paper towels) and pat dry. When water combines with hot oil, the result can be dangerous. Also, wet fries steam rather than crisp up. For additional crunch, place them on a tray and freeze for 30–60 minutes. I feel smug when I do this, but I don’t have to.
4) First fry (low temperature): cook through without browning.
heat 2–3 inches of oil to 300°F (150°C). Fry in small batches for 4-6 minutes, stirring gently, until the fries are soft and pale with a color just starting to show. You are just trying to “get them done” by pinning the shell and building the temporary set. Remove and let them drain on a rack or a tray lined with paper towels.
5) Rest (important).
You need to let the fries rest for 10 – 20 minutes. This is useful if you need to time dinner as they can sit for longer, even in the fridge. This resting step is what creates crisp futures.
Raise oil to 375°F (190°C). Cook the partially cooked fries in batches for 2 to 4 minutes until they are golden brown and crispy with little blisters. The difference between “perfect” and “why do these taste like a campfire?” is very slight.
7) Salt the dish immediately and serve while hot.
Drain quickly, then while still shining, toss with fine salt. Serve right away. Fries aren’t like soup. They won’t wait.
Ways to Change It Up
- Extra-crisp freezer method: After the first fry, cool, then freeze on a tray 1 hour (or overnight in a bag). Fry from frozen at 375°F until crisp.
- “Lightly seasoned” fries: Add a pinch of white pepper and garlic powder to your salt (go easy, this isn’t curly fries territory).
- Air-fryer finish (hybrid): Do the first fry at 300°F, then finish in an air fryer at 400°F until crisp. Not identical, but surprisingly good when you don’t want a second oil bath.
- Skin-on copycat: Leave some peel on for a more rustic look. It drifts away from McD’s, but it tastes great.
- Spicy dust: Fine salt + a whisper of cayenne. Not authentic, but dangerously snackable.
Rounding Out the Plate
- Classic burger night: Smash burgers, American cheese, pickles, and these fries, the whole kitchen smells like a good decision.
- Fish sandwich situation: Crispy fish fillet, tartar sauce, shredded lettuce. Fries are non-negotiable.
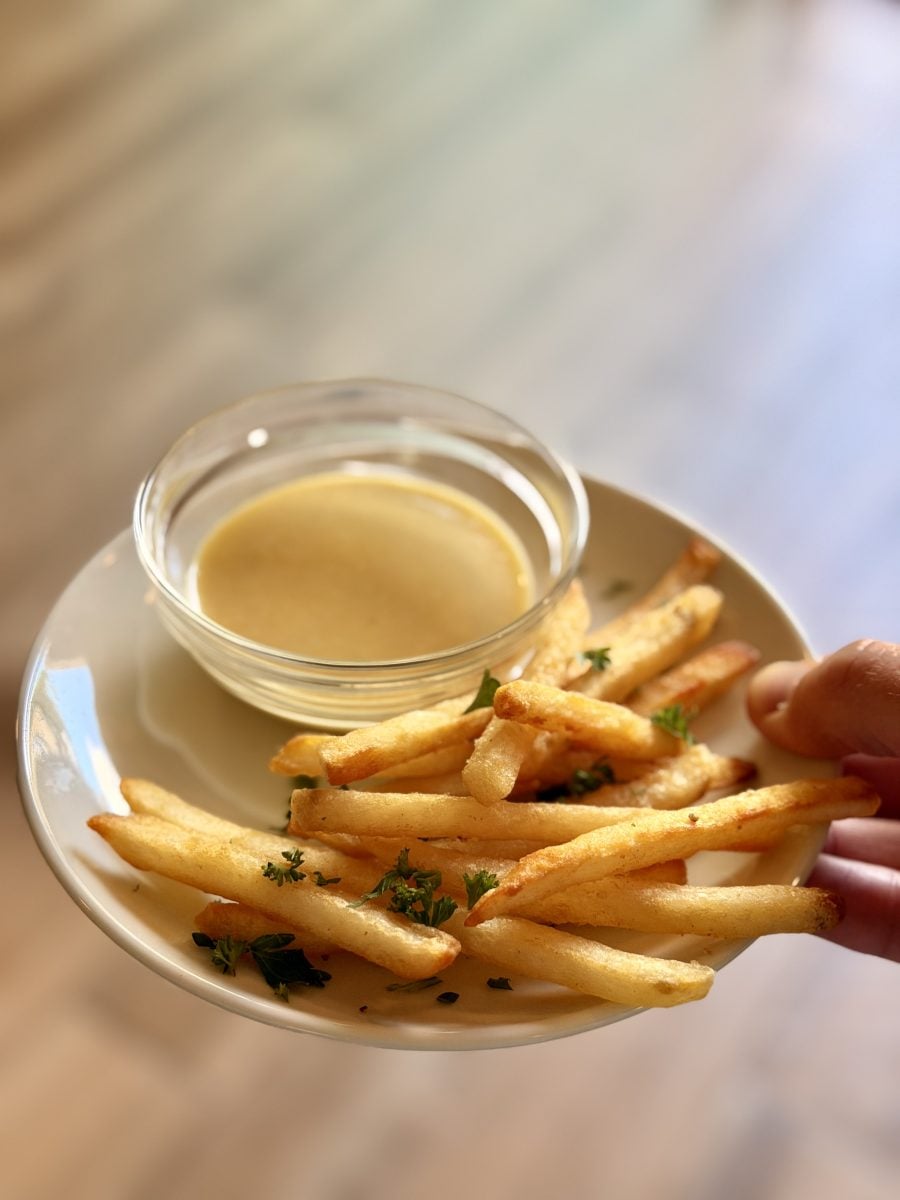
- Dip trio: Ketchup + mayo + a quick “special sauce” (mayo, ketchup, relish, pinch of paprika).
- Breakfast-for-dinner: Fried eggs and fries with hot sauce feels slightly unhinged, in a good way.
- Movie-night cone: Serve in paper cones or little bowls with extra salt on the side: people love the theater of it.
Fixes and Pro Moves
- Soggy fries: Oil likely too cool or batches too large. Use a thermometer and fry fewer at a time.
- Fries browning before they’re cooked through: First fry temp too high, or fries cut too thick. Keep that first stage at 300°F and aim for 1/4-inch sticks.
- Fries sticking together: Not rinsed/soaked enough, or you dumped them in as a tangled clump. Rinse until less cloudy and add fries gradually.
- Greasy texture: Usually low oil temp (fries absorb oil instead of crisping). Also: don’t drain in a pile: use a rack if you can.
- Not enough “McDonald’s vibe”: Use fine salt, keep them pale-golden rather than deeply brown, and don’t over-season. The restraint is part of the spell.
- Oil management: Skim stray bits between batches; burnt crumbs make everything taste vaguely bitter.
- Salt timing: Salt the moment they come out of the final fry. Wait 60 seconds and it just… doesn’t stick the same.
Storage, Reheating, and Nutrition
Yes, these are an indulgence as they are deep-fried potatoes. Nutrition varies wildly based on how much oil adheres to the fries (which varies due to oil temperature, how long the oil was drained, and the size of the batch). When the oil is hot and the fries are drained properly, they will seem lighter than expected. But they are still fries, glorious salty fries.
As for storage, fries peak within minutes. If you are saving leftovers, let them cool completely, then refrigerate them in a container that is covered loosely (so they don’t get steamed.) Bake in a 425°F (220°C) oven or air fryer until crispy. I don’t know the rules so I’m not going to argue with them, but microwaving makes them definitely limp and sweet in a weird way.
Field Notes
Initial run: The ‘friends dropped by’ scramble. I had three russets, and I had precisely one hour before guests arrived. While engaging in conversation and pretending I wasn’t behind, I took a 30-minute soak, then did a quick first fry while everyone was hovering by the stove like seagulls. Ten minutes later, a second batch of fries went in, and the room became quiet in that special way that happens when people are chewing with delight and are all thinking, \”Wait, you made these?\”
Example 2 The batch-size lesson I learned the hard way. Once I tried frying everything at once because I was feeling efficient (and a bit smug). The temperature of the oil had dropped, the fries steamed, not fried, and I ended up with pale, bendy, sticks of disappointment. Same potatoes, same oil, same salt. Too many people. I would prefer to make six small batches of something than make one giant regret.
Your Game Plan
- Cut russets into 1/4-inch (6 mm) sticks.
- Rinse until water is less cloudy; soak 30 minutes in cold water (optional vinegar).
- Drain and dry very thoroughly (optional freeze 30–60 minutes).
- First fry at 300°F (150°C) for 4–6 minutes; drain.
- Rest 10–20 minutes (or chill).
- Second fry at 375°F (190°C) for 2–4 minutes; drain.
- Salt immediately; serve hot.
The Jargon, Explained
- Russet: A high-starch potato that fries up fluffy inside and crisp outside.
- Surface starch: Starch clinging to the outside of cut potatoes; too much can make fries stick and brown unevenly.
- Par-fry: The first, lower-temperature fry that cooks the interior and sets structure without heavy browning.
- Double-fry: A two-stage fry method (low temp first, high temp second) for maximum crispness.
- Blistering: Tiny bubbles on the surface of the fry that signal crisp, properly fried exterior.
- Carryover cooking: Heat continues to move and cook food after it’s removed from oil; resting helps the crust set.
Your Questions, Answered
Should I peel the potatoes?
Not at all. Kui McDonald’s oleksel nahk peal, mitte ainult kooritud kartulid. Scrub well and expect a more rustic fry.
Do I have to soak the fries?
You don’t have to but it makes a difference between pretty good homemade fries and oh wow. A soak of 20–30 minutes helps.
Why put vinegar in the soak water?
A little bit helps the outside stay intact and crisp up more, which is especially helpful for thinner fries. Be sure to keep it modest so that it will not have a tangy flavor.
Can I prep these in advance for a party? Yes, you can do the first frying stage, let them cool, and then refrigerate (or freeze) them on a tray. Perform the second fry just before serving. This is definitely the most stress-free method for serving fries to a large group.
What’s the best oil temperature if I don’t have a thermometer?
I’ll be honest: this is where fries go to die. If necessary, use visual cues. When frying for the first time, the bubbles should be active but not crazy. When frying for the second time, there should be a lot of bubbles and it should be loud. Buying a $10 themometer is the smarter choice.
Why are my fries dark but not crisp?
Your oil may have had old burning crumbs (bitterness/darkness) or your potatoes may have extra sugars (older potatoes can brown faster). Try to use new oil, skim between each batch, and select russets that feel firm, not wrinkled.
Wrapping Up
Copying a fast-food dish, and getting it right, feels oddly satisfying. It’s like you’ve taken a small part of the fast-food world, and added it to your own, not quite perfect, home kitchen. Make them one time and you’ll begin to recognize the little tells: the distinct sound when the food hits the tray, how fine salt melts into the surface, the instant the second fry changes states from “still soft” to “crackly and ready.” And of course, you’ll eat one standing at the stove. You should. That’s the cook’s tax.